The elegance of a Kohler faucet lies not just in its design, but in the precision engineering of its components. Yet, when the simple act of removing a handle becomes an immovable challenge, that precision can feel like a fortress. If you’re currently in a standoff with a stubborn faucet handle, you’ve arrived at the definitive resource. This isn’t just another list of quick fixes; this is a deep exploration into the very science of why your handle is stuck.
We’ll journey into the microscopic world of mineral crystallization, explore the electrochemical battles happening within the metal of your faucet, and understand the synergistic forces that create a bond seemingly stronger than the faucet itself. By understanding the problem at its foundational level, you will not only be equipped to solve it but also to prevent it from happening again. This article provides the expertise and in-depth knowledge necessary to tackle this frustrating issue with confidence and authority.
The Science Behind the Seizure: A Microscopic View of a Macroscopic Problem
On the surface, the problem is simple: the handle won’t budge. The root causes, however, are a fascinating interplay of chemistry and physics. While most guides will correctly name mineral buildup and corrosion as the culprits, they barely scratch the surface of these powerful phenomena.
1. Mineral Buildup (Limescale)
This chalky, white substance is the ghost of your water supply, left behind through evaporation. Water, especially “hard water,” is rich in dissolved mineral ions, primarily calcium (Ca²⁺) and magnesium (Mg²⁺).
- The Process of Crystallization: As water sits on the surface or in the tiny crevices between your faucet handle and the valve stem, it evaporates, leaving these ions behind. They don’t simply dry into a powder; they bond together, forming a highly organized and rigid crystalline structure known as calcium carbonate (CaCO₃), or limescale. This process, explained in detail by institutions like the U.S. Geological Survey, is relentless.
- Mechanical Interlocking: The surfaces of your faucet components, which appear perfectly smooth to the naked eye, are microscopically rough with peaks and valleys. As these limescale crystals grow, they expand into these imperfections, creating thousands of microscopic anchor points. This mechanical interlocking acts like a powerful, naturally formed cement, effectively fusing the handle to the stem.
2. Corrosion: The Faucet’s Silent Decay
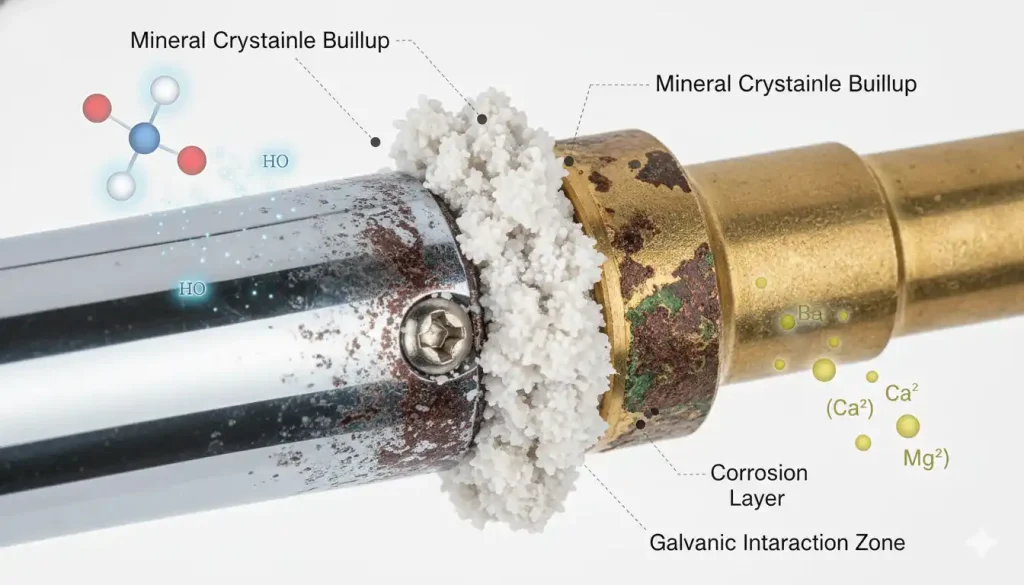
Corrosion is not simply rust; it is a complex electrochemical process that actively degrades the metal. The warm, wet environment inside a faucet is a perfect breeding ground for this process, particularly galvanic corrosion.
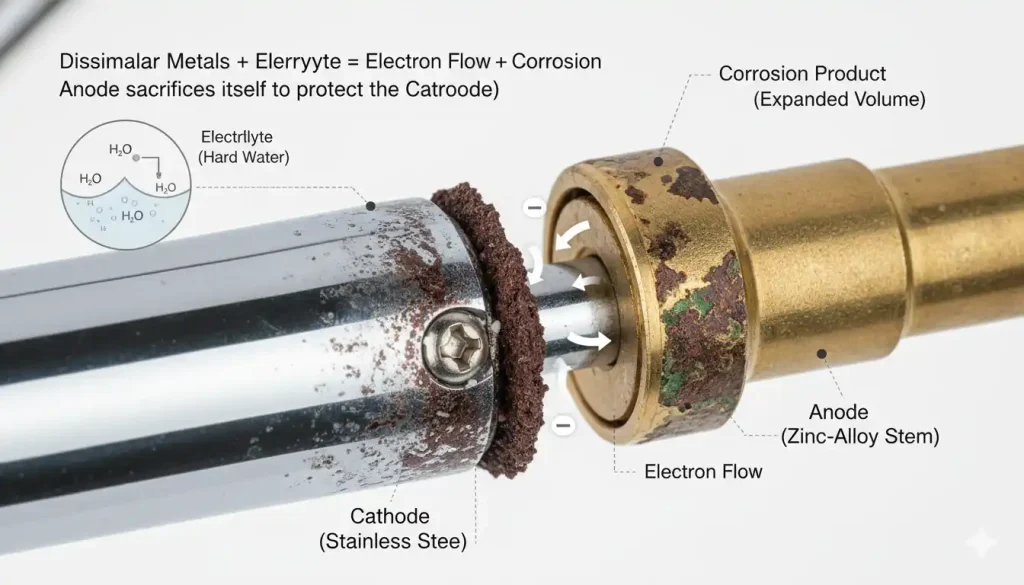
- The Galvanic Cell: As explained by experts in material science, galvanic corrosion occurs when two different metals are in electrical contact in the presence of an electrolyte (your tap water). A faucet is an assembly of various metals—often a brass body, a stainless steel set screw, and a zinc or aluminum alloy valve stem. This creates a miniature battery.
- Anode and Cathode: In this battery, the more reactive, or “less noble,” metal becomes the anode and begins to sacrifice itself, corroding at an accelerated rate. The less reactive metal becomes the cathode and is protected. For example, a zinc component will corrode to protect a brass one.
- The Destructive Expansion: The byproduct of this corrosion isn’t just degraded metal; it’s a new substance, typically a metallic oxide or salt. Crucially, this corrosive byproduct occupies a larger volume than the original pure metal. This expansion acts like a wedge, exerting immense pressure between the handle and the stem, creating a friction lock that can be impossible to overcome with simple force.
The Unseen Architecture of Adhesion
What the internet tutorials don’t explain is the fundamental nature of the bonds holding your handle hostage. We’re not just fighting against visible scale or rust; we are fighting against the laws of chemistry at a molecular level. The water molecule (H₂O) itself is the key actor. Its polarity—a slight negative charge at the oxygen atom and slight positive charges at the hydrogen atoms—makes it a universal solvent. This polarity allows it to pluck ions from metals and minerals.
When it evaporates, the forces that held those ions in the water now pull the ions toward each other and toward the metallic surfaces of the faucet. The resulting crystalline lattice of limescale is held together by powerful ionic bonds. Simultaneously, this trapped, ion-rich water acts as a supercharged electrolyte, accelerating the galvanic corrosion, which is itself an exchange of electrons at the atomic level. You are not trying to remove a stuck handle; you are trying to break millions of microscopic, interlocking chemical and mechanical bonds.
Identifying Your Kohler Faucet: A Critical First Step
Before any tools are touched, you must become an expert on your specific faucet model. Kohler has produced a vast array of designs over the years, and the handle removal mechanism is a key differentiator. Applying the wrong technique can lead to permanent cosmetic or functional damage.
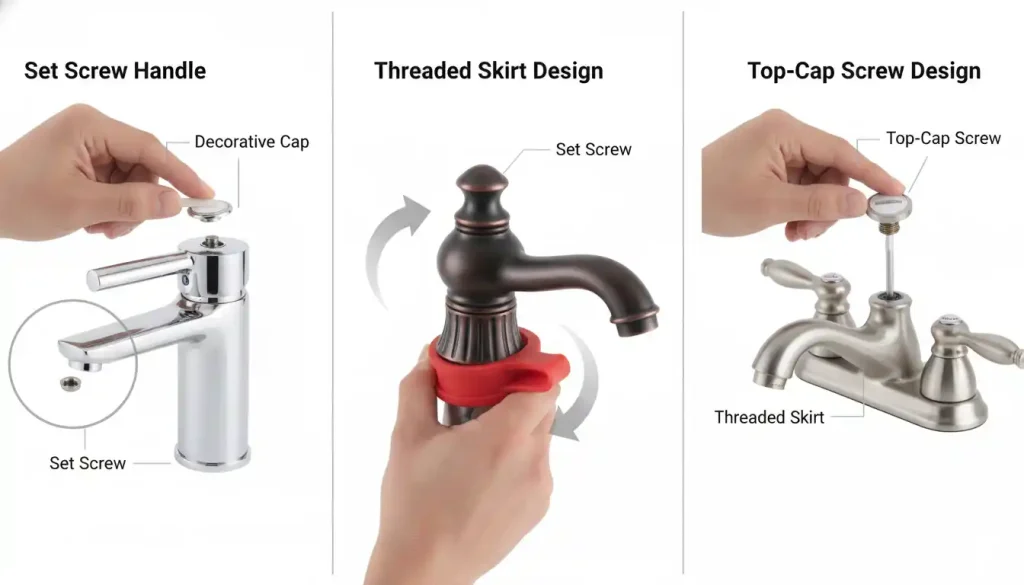
- The Set Screw Design: This is the most common type on modern Kohler faucets, including many models in the Memoirs, Devonshire, and Artifacts collections. The handle is secured by a small, often hidden, set screw.
- Location: The screw is typically located on the underside of the handle or concealed beneath a decorative cap on the top or side. This cap might be made of metal or plastic and can often be identified by a small seam. It may bear the Kohler logo or a temperature indicator (a red/blue dot).
- Tool: You will almost always need a hex key (Allen wrench) for these screws, typically in a small size like 3/32″ or 2.5mm.
- The Threaded Skirt/Base Design: Found on certain traditional and vintage-style faucets, this design forgoes a set screw entirely.
- Mechanism: The handle itself sits atop a wider, decorative base or “skirt.” This entire base is threaded and screws directly onto the faucet body, holding the handle in place via pressure.
- Identification: If you can find absolutely no sign of a set screw or a removable cap anywhere on the handle, you likely have this type. Gently twisting the very bottom of the handle base (counter-clockwise) will confirm this if it moves independently of the handle itself.
- The Top-Cap Screw Design: Some older models may have a more straightforward design where the decorative cap on the very top of the handle itself is threaded. Unscrewing this cap reveals a standard Phillips or flathead screw beneath it that secures the handle.
Pro Tip: If you are unsure of your model, take a few clear photos of the faucet from different angles and use Google Lens or visit the official Kohler support website. Identifying the model can often lead you to a technical diagram, removing all guesswork.
The Standard Removal Process: A Methodical Approach
Always begin by turning off the water supply to the faucet. The shutoff valves are typically located directly under the sink. Turn them clockwise until they stop. Then, open the faucet to drain any residual water and relieve pressure.
For Set Screw Handles:
- Expose the Screw: If there’s a decorative cap, carefully pry it off. Use a tool that won’t scratch the finish, like a nylon pry tool, a small flathead screwdriver with its tip wrapped in electrical tape, or even a sturdy toothpick.
- Apply a Penetrant: Before you even attempt to turn the screw, spray a small amount of a high-quality penetrating oil (like PB B’laster or Liquid Wrench) directly into the screw hole. Let it sit for at least 30 minutes to an hour. This is a critical step often skipped by amateurs.
- Select the Right Tool: Ensure your Allen wrench is the exact correct size and in good condition. A worn wrench is more likely to strip the screw head.
- Break the Bond: Insert the wrench fully into the screw head. Give it a few firm taps with the handle of a screwdriver to help break the corrosive bond.
- Loosen the Screw: Apply firm, steady pressure counter-clockwise. A slow, high-torque motion is more effective than a quick jerk. You only need to loosen it a few turns; it doesn’t need to be fully removed.
- Lift the Handle: Once the screw is loose, the handle should lift straight off. If it doesn’t, proceed to the advanced techniques.
For Threaded Skirt Handles:
- Protect the Finish: The biggest risk here is scratching the decorative base. Wrap the base with a soft cloth or a rubber jar opener.
- Apply Force Correctly: Use a strap wrench for the best grip without causing damage. A pair of padded channel-lock pliers can be used with extreme care. Grip the base and turn it counter-clockwise. Hold the upper part of the handle steady to prevent the entire fixture from turning.
- Lift Off: Once the base is unthreaded, the handle will simply lift off.
When the Handle Fights Back: Advanced Removal Strategies
If the standard methods have failed, it means the bond of corrosion and minerals is severe. It’s time to escalate your approach with patience and the right tools.
- Chemical Warfare: The Power of Acid: For extreme mineral buildup, white vinegar is your best weapon. Its acetic acid chemically reacts with the calcium carbonate, dissolving it.
- Application: Soak a rag in a 50/50 solution of white vinegar and hot water. Wrap the rag tightly around the base of the handle, ensuring the solution can penetrate the seam between the handle and the stem. For maximum effect, cover the rag with a plastic bag to slow evaporation. Let it sit for several hours, or even overnight, reapplying the solution periodically.
- The Introduction of Heat: Metal expands when heated. Gently heating the handle can cause it to expand slightly more than the valve stem, helping to break the bond.
- Method: Use a hairdryer or a heat gun on a low setting. Carefully heat the outside of the handle base, moving the heat source constantly to avoid damaging any plastic components or rubber seals inside. After heating, immediately (and carefully) try to wiggle or pull the handle.
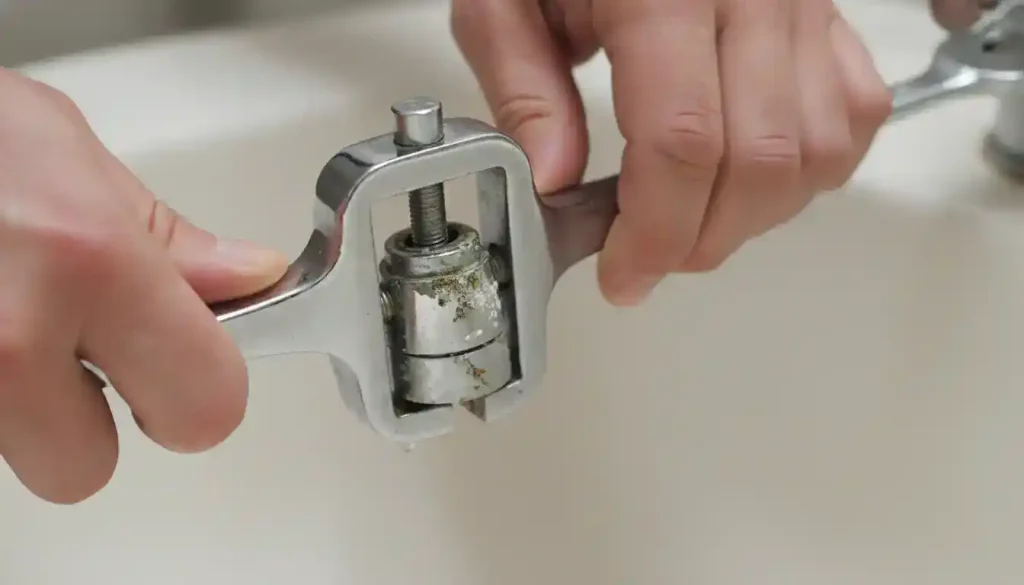
- The Professional’s Tool: The Handle Puller: This is the safest and most effective mechanical method. A faucet handle puller is a specialized tool that looks like a small gear puller.
- How it Works: The tool’s arms hook underneath the handle while a central screw presses down on the top of the valve stem. As you tighten the screw, it exerts a perfectly even, vertical pulling force on the handle, a force that is far greater and less damaging than you could ever achieve by wiggling or prying. This tool can be purchased at most hardware or plumbing supply stores and is a worthwhile investment for any serious DIYer.
The Unspoken Symphony of Corrosion and Hard Water
What is almost never discussed is the destructive feedback loop created by the combination of hard water and corrosion. Limescale deposits are not inert; they are active participants in the faucet’s decay. The porous, crystalline structure of the scale acts like a sponge, trapping moisture and corrosive ions (like chlorides, which are devastating to stainless steel) directly against the metal surface. This creates a perpetually moist, oxygen-deprived environment underneath the scale, leading to a highly aggressive form of localized decay called crevice corrosion. The metal trapped in this crevice becomes anodic and corrodes rapidly, producing more corrosion byproduct, which further locks the handle in place. In essence, the mineral buildup creates the ideal acidic and oxygen-starved micro-environment that dramatically accelerates the electrochemical corrosion process. The two forces work in a destructive symphony, creating a situation that is far more challenging to resolve than either problem would be on its own.
Local Help for Your Stuck Faucet: Navigating Hard Water in [Your Area]
The severity and frequency of this problem are directly linked to your geographical location. The “hardness” of your water is determined by the geology of the region your water supply flows through. Areas with limestone and gypsum bedrock, like much of the American Midwest and Southwest, have notoriously hard water.
- Understanding Your Local Water: Before you can prevent future issues, you need to know what you’re dealing with. You can find detailed information about your local water quality, including its hardness level (usually measured in Grains Per Gallon or GPG), by checking the annual water quality report from your municipal water utility. These are often posted on their website. For example, residents of [Your City/Region] can check the [Your City Water Department] website for this information.
- When to Call a Professional in [Your Area]: If you have tried the advanced techniques—especially if you’ve encountered a stripped set screw or the handle simply will not yield to a puller—it is time to call a professional. Forcing the issue further can break the valve stem or the faucet body, turning a small repair into a major, expensive replacement. When searching for a plumber in [Your Area], look for:
- Licensed and Insured: Ensure they have the proper credentials for your state and locality.
- Positive Local Reviews: Check sources like Google Maps, Yelp, or the Better Business Bureau for feedback from your neighbors.
- Experience with Major Brands: Specifically ask if they have extensive experience working with premium brands like Kohler.
By understanding the deep-seated causes of your stuck faucet handle and approaching the problem with a patient, methodical, and informed strategy, you can overcome this common but challenging home repair project. You are now armed not just with steps, but with the fundamental knowledge to be the true master of your home’s maintenance.